


Don't let a spring thaw lead to a wet basement
|
Whether your region is covered in a blanket of white snow or water from continual rainfall, you may experience basement moisture problems. New homeowners may not even be safe from the water Mother Nature delivers each year.
The majority of homeowners' water seepage problems can be attributed to seasonal conditions. Rapid runoff and the frozen ground's inability to absorb the water leave only one place for the water to go -- and unfortunately, it's right through the walls. Typically, the spring and fall rainy seasons are peak times to experience water seepage.
Homeowners commonly associate water problems with expensive excavation and drainage. But, a waterproofing project can be completed for around $500.00 using a high-quality masonry waterproofing paint, such as DRYLOK® Masonry Waterproofer by United Gilsonite Laboratories, a Scranton, Pennsylvania based manufacturer that has been helping homeowners safeguard against water seepage problems since 1957.
The first thing to remember when looking for a product to stop water seepage is that you need a waterproofer, not a watersealer. There are differences between the two. Watersealers only repel water but will not stop actual water penetration. A product, such as DRYLOK® Masonry Waterproofer penetrates the surface and bonds itself to the masonry to act as an integral barrier to stop water seepage. Ordinary paint merely adheres to the surface, and oncoming water pressure can force it off.
Here are the steps to take to address seepage and stop basement damage.
Find the Water Source
Homeowners must remember that a wet basement wall might be a symptom of a larger problem. Water may be coming from a variety of sources such as leaky downspouts or gutters, blocked drainage pipes, improper grading, or ruts that direct ground runoff toward foundations. Correcting these problems -- combined with the application of a quality waterproofing paint -- is the best way to prevent water on masonry surfaces.
Similarly, it is necessary to find out if seepage or condensation is the source behind wet walls. This can be determined by performing a simple test. Tape a one-foot square piece of aluminum foil tightly to a dried interior basement wall. You can dry a small area to test with a cloth or hair dryer. Remove the foil after several days. If the room side is wet, the problem is condensation and a dehumidifier should be used. If the wall side of the foil is wet, there is seepage. Remember that both problems can occur at the same time.
Once you determine your problem, there are two main parts of any waterproofing job: Surface preparation and application of the waterproofer itself.
Surface Preparation
As in any painting job, surface preparation is a critical step. Loose or broken mortar, dirt, dust and other foreign matter should always be removed before putting on a new coat of paint.
Before applying the waterproofer, clean the surface thoroughly. Waterproofing paint works best when applied to a clean, bare masonry surface. It may be applied on a slightly damp surface but best results are obtained when applied over a dry surface. To determine if the wall is too wet to paint, try this simple test: Rub your fingertips over the surface you want to paint. If your fingertips are wet, do not paint the surface. Wait 48 hours and repeat the test. For best results, wait for a dry spell.
Remove old paint by wire-brushing, sandblasting or another suitable means. The worst enemy for any masonry paint is efflorescence, or white, crystal-like salt deposits that prevent a waterproofer from adhering to a surface. Muriatic acid or a product like DRYLOK® Etch should be used to rid the surface of efflorescence. Holes should be patched with an hydraulic cement.
A common area that may be overlooked as a source of water seepage is the floor/wall joint. Normally, when concrete floors cure, they shrink and pull away from the wall, allowing a space for water to enter. That's why it's necessary to seal all gaps between floor and walls with a fast-drying cement, such as DRYLOK® Fast Plug. Clean the area and wash with water prior to sealing.
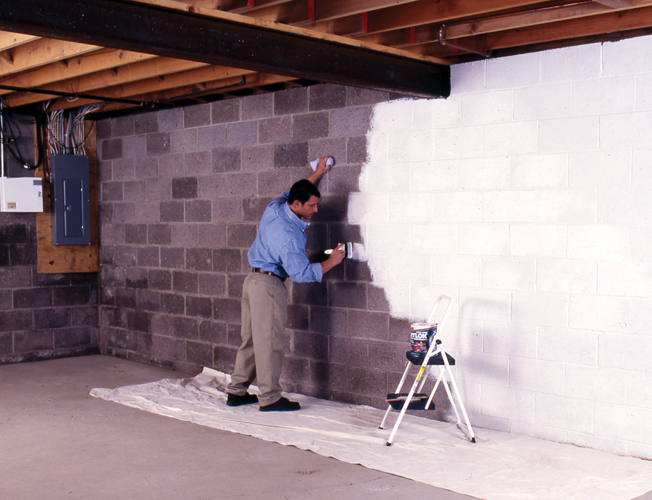
Applying the Waterproofer
Now, you're ready to apply waterproofer to your basement walls. For best results, apply the first coat with a nylon or polyester bristle brush. The second coat can be applied with a brush or masonry roller. Work the paint thoroughly into the pores of the masonry. For optimum bonding, apply to a dry surface.
Follow directions for application carefully. If the area you covered is more than the recommendation on the label, you're spreading the paint too thin. Two coats are usually sufficient to stop seepage. However, if seepage is still present after several days, an additional coat may be necessary.
Open windows and use a non-sparking exhaust fan to provide adequate ventilation when applying a waterproofer in closed areas. In places, where good cross-ventilation is not possible, or if you are sensitive to solvent odors, the experts at UGL recommend using a latex-based product, such as Latex Base DRYLOK® or DRYLOK Extreme®. Remember to read the label of the product thoroughly for application and ventilation requirements.
For the free booklet, "Waterproofing Made Easy," and a dealer nearest you, write to UGL, P.O. Box 70, Scranton, PA, 18501, visit the Web site www.ugl.com, or call toll free 1-800-272-3235.